|
Fetch For Mac Users
In order to FTP into your website
you will need the following information which was included
in your account activation notice.
USERNAME
PASSWORD
FTP HOSTNAME
When you have this information, and
a copy of Fetch installed on your computer, you will be ready
to setup a New Connection and FTP into your website.
1. Launch your Fetch program.
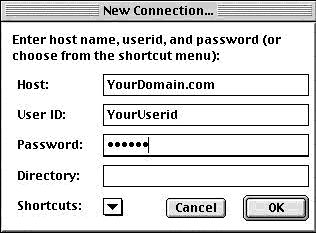
2. Select New Connection from the File menu to create
a new Connection.
3. Enter the appropriate information into the entry
boxes as indicated below.
HOST: Enter yourdomain.com
USER ID: Enter your Username
PASSWORD: Enter your Password
DIRECTORY: Leave this entry field blank.

4. Click on the OK button
to connect to your website on the server. When you are connected
the New Connection panel will close, and the main Fetch window
will pop up.
Bookmark Connection
Once you have established a connection
you should bookmark it. This will save you the time and trouble
of entering your log in information each time you want to
FTP into your account.
1. From the Customize menu select New Shortcut.
2. A window titled Bookmark Editor will pop up. The
Name, Host, and User ID entry boxes will contain the information
you used for your current connection.
3. In the Type field, select File from the pop-up menu.
4. If you would like Fetch to remember your password,
type it into Password field.
5. Under the same Customize menu, choose Preferences,
and make sure the connection you just entered is selected
as the default shortcut under the General tab.

Your Bookmark has been created. The
next time you run Fetch your shortcut will be opened automatically.
All you'll have to do is click the OK button to establish
your FTP connection.
Binary vs. ASCII
or Auto
There are three radio buttons at
the bottom of the Fetch Window. One labeled Binary, one labeled
ASCII and one labeled Auto.
If you want Fetch to automatically select the correct setting,
either Binary or ASCII, when transferring your files, do the
following:
1. Select Auto in the Fetch window.
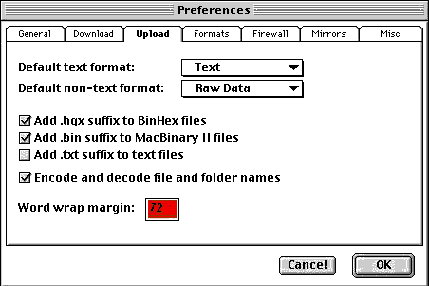
2. Select Preferences, then the Upload tab.
3. Be sure that the following settings apply:
Default text format---set to TEXT
Default non-text format-set to RAW DATA
Check "Add .bqx suffix to BinHex files"
Check "Add .bin suffix to MacBinary II files"
Uncheck "Add .txt suffix to text files"
Check "Encode and decode files and folder names"
Word Wrap Margin…72

If you elect not to use the Auto
setting please note that it is very important to transfer
images in Binary mode. Everything else, HTML documents, cgi
scripts etc. should be transferred using ASCII mode. If you
fail to set this correctly your files may not appear as they
should.
Fetch Window
Your main window will be divided into two parts. On the left
will be a large window which will display the files and folders
on your domain. The narrow section on the right will contain
your current Status, a File command link and a Transfer command
link.

Upload Files
1. Double click on the www directory in the Fetch window
to open it. This is the directory you will upload your web
pages, files, images etc. into.
2. Highlight the file (s) on your computer that you
wish to transfer to your website, and click on the Transfer
command link. Or, you may also drag the file(s) you wish to
upload from your hard drive onto the Fetch window and drop
them into the appropriate directory.
Download Files
1. Double click on the folder you wish to download
files to on your computer to open it.
2. Highlight the file (s) on your website in the Fetch
window that you wish to transfer to your computer, and click
on the Transfer command link. Or, you may also drag the file(s)
you wish to download from the Fetch window onto your hard
drive and drop them into the appropriate directory.
|

