|
Dreamweaver 4
1.
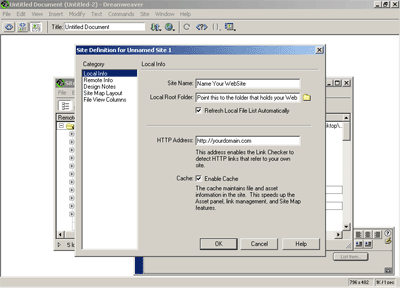
Open Dreamweaver. From the menu bar select "site" and then
"open site"
2. Fill in the appropriate fields:
Site Name = Name Your Web Site
Local Root Folder = This will be the path to your local folder
that holds your web site files.
HTTP Address = yourdomain.com

3.
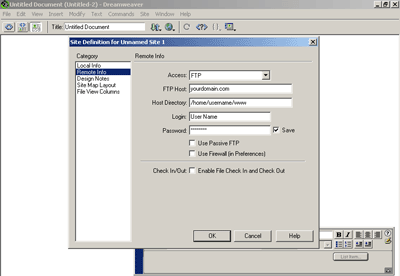
Select Remote info on the left navigation bar. Drop down the
access menu and select FTP
4. Fill in the appropriate
information:
Access = FTP
FTP Host = yourdomain.com
Host Directory = /home/username/www. This will then upload
the files directly into your www directory.
Login = User Name
Password = Password
Click OK

5.
This will then open the Dreamweaver FTP program.
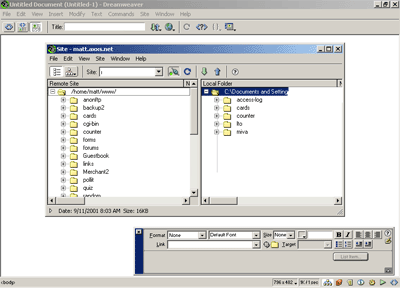
6. Click on Connect button
on the top menu bar. The raised button in the picture below
is the connection button.

7. Your are now connected to the
server and you will see two windows
Left Window
Dreamweaver will now display a split
screen. The window on the left will contain the folders and
files contained within your www directory. This is your space
on the server. This is where you will place your website.
You will see folders with names such as infobots and access-log.
Right Window
The window on the right will contain
the folders and files on your local computer. This should
be pointing correctly to your local Web Site.

Upload Files
1.
Highlight a file (or files) from your computer in the right
window.
2. Click the blue up arrow button on the menu bar
to transfer your files
3. You will see a note in
the status bar at the bottom when your file transfer is complete.
Download Files
1.
Double click on the folder you want to download files into
on your computer to open it in the right window.
2. Highlight the file (or
files) you wish to download from your website in the left
window.
3. Click the green down arrow on the Menu bar to transfer
the files.
4. You will see a note in
the status bar at the bottom when your file transfer is complete.

The picture above shows that by selecting
the blue up arrow, you will be placing a file called hook.gif
into your web site located on the server. To disconnect, select
"file" and then "close"
|

